Configured for Varnish, RabbitMQ, and Cron. An overview of starting a DDEV project, and also using an existing one, that I am sharing.
Table of Contents
Intro
Local development environments are always a challenge. Until you find one you like, and understand. This post is aimed at condensing my scattered notes on setting up a DDEV project for Magento 2, while providing others with the cliff notes. Using the boilerplate I’ve built makes this a very fast process, but setting up that boilerplate really isn’t that difficult either. I am outlining both.
What even is DDEV
In essence, DDEV is just a fancy wrapper for docker-compose files.
The docs have a nicer way of saying this:
DDEV is an open source tool for launching local PHP development environments in minutes.
These environments can be extended, version controlled, and shared, so you can take advantage of a Docker workflow without Docker experience or bespoke configuration. Projects can be changed, powered down, or removed just as easily as they’re started.
We can consider DDEV analogous to Warden, or even SwiftOtters fork called Den. Mark Shust also has a very well built out docker setup specifically for Magento 2. If you’re familiar with Craft CMS this can be considered like the old Nitro (now deprecated). My interest with DDEV is not that it’s better than any of these other choices, but for me, it’s just easier. Less.. “Stuff”. Configuration for almost any stack is nothing we aren’t already familiar with if we work with docker compose projects or docker files. Using the services and containers in the project is a breeze, and makes a lot of tools we may otherwise have used, pointless.
Getting Started
This is my extended version of the official DDEV quickstart guide for Magento 2.
Install DDEV
Refer to the official docs on installing DDEV. Currently for Debian/Ubuntu:
1
2
3
curl -fsSL https://apt.fury.io/drud/gpg.key | gpg --dearmor | sudo tee /etc/apt/trusted.gpg.d/ddev.gpg > /dev/null
echo "deb [signed-by=/etc/apt/trusted.gpg.d/ddev.gpg] https://apt.fury.io/drud/ * *" | sudo tee /etc/apt/sources.list.d/ddev.list
sudo apt update && sudo apt install -y ddev
It’s a very simple setup, regardless of your OS.
Special note for Mac and Windows though: USE MUTAGEN. It’s a one time configuration command - ddev config global --mutagen-enabled This will help immensely with the poor I/O performance normally experienced on Mac/Windows when working with virtualized environments.
Create DDEV project
Before we dive in - there is a shortcut past most of this if you would like.
The result of all of the following is in a github repository: https://github.com/Bwilliamson55/ddev-m2 You can clone that project, and start from the “Start DDEV for the first time” step.
Time for the fun stuff. We’re going to create a directory for our project, then use a DDEV command to initialize the .ddev folder, and some settings.
Important note: Disabling the settings management is important for Magento’s config changes to persist should you relocate your project. This is temporary during install, specifically so the /app/etc/env.php file remains User controlled.
1
2
3
4
5
# Make the directory and switch to it
mkdir m2-project && cd $_

# Initialize the project configuration (.ddev folder creation)
ddev config --project-type=magento2 --php-version=8.1 --docroot=pub --create-docroot --disable-settings-management
Output should be similar to the following 
Configure a few DDEV things
Timezone + DB Port
For more local time stamps, we will add our timezone to the .ddev/config.yaml file, as well as a static Database port.
Insert the following 2 lines, substituting your timezone (Wiki of time zones here)
1
2
timezone: America/New_York
host_db_port: "3307"
Without the explicit DB port, the DB will have a random port every ddev start or ddev restart . This can be a good thing, but I prefer to set up my DB explorer once and be done with it.
Omit container(s)
If you’re like me, you don’t enjoy phpMyAdmin - and use stand alone tools. Normally DDEV will spin up a “dba” container with phpMyAdmin for us. While certainly handy for some, my preference is to exclude that container by adding the following line to the config.yaml
1
omit_containers: [dba]
Add custom FQDN
Per the docs, - we can also add any domains we like, and these will be automatically secured with SSL.
In my case I’m only going to add magento.test :
1
additional_fqdns: ["magento.test"]
So with these modifications, the top of my config.yaml file looks like this:
1
2
3
4
5
6
7
8
name: m2-project
type: magento2
timezone: America/New_York
host_db_port: "3307"
omit_containers: [dba]
# ... stuff ... #
additional_fqdns: ["magento.test"]
# ... stuff ... #
Add services
DDEV has a wonderful feature where you can pull in community or official “services”: https://github.com/ddev/ddev-contrib/tree/master/docker-compose-services You can use the official template for crafting your own add on: https://github.com/ddev/ddev-addon-template For this we will use a combination of community and official services:
- Elasticsearch https://github.com/ddev/ddev-elasticsearch
- Varnish https://github.com/ddev/ddev-varnish
- RabbitMQ https://github.com/ddev/ddev-contrib/tree/master/docker-compose-services/rabbitmq
- Cron https://github.com/ddev/ddev-cron
Elasticsearch
1
ddev get ddev/ddev-elasticsearch
Varnish
1
ddev get ddev/ddev-varnish
RabbitMQ
Installation
- Copy docker-compose.rabbitmq.yaml to your project’s
.ddevfolder From your project directory do1 2
cd .ddev wget https://raw.githubusercontent.com/ddev/ddev-contrib/master/docker-compose-services/rabbitmq/docker-compose.rabbitmq.yaml - Copy the directory rabbitmq-build to your project.
From your .ddev folder do
1
2
mkdir rabbitmq-build && cd $_
wget https://raw.githubusercontent.com/ddev/ddev-contrib/master/docker-compose-services/rabbitmq/rabbitmq-build/enabled_plugins
The rabbitmq-build directory contains the enabled plugins, these are required for having a functioning RabbitMQ service, as the container would otherwise stop itself shortly after starting. The plugins themselves are what enables the management UI and the graphs within it.
Important: If you need to run multiple ddev sites that use this RabbitMQ service, you will have to alter the ports per site in the docker-compose.rabbitmq.yaml.
RabbitMQ Management UI
The management UI can be accessed through http://<DDEV_SITENAME>.ddev.site:15672 on the host machine.
Username “rabbitmq”, password “rabbitmq”.
AMQP protocol access
You can access the RabbitMQ service through it’s AMQP protocol several ways:
- From the host machine:
amqp://<DDEV_SITENAME>.ddev.site:5672 - From docker containers on the same docker network (ddev_default):
amqp://ddev-<projectname>-rabbitmq:5672 - I opt for simply using the container name -
rabbitmqin the configuration as shown shortly
Cron
From within the project
1
ddev get ddev/ddev-cron
The readme for this add on ( https://github.com/ddev/ddev-cron ) may not be immediately clear.
What this add on is doing, is installing the cron service to the web container, and instructing us to utilize the DDEV lifecycle hooks (Add link to the docs about that here) to create a crontab every ddev start.
For most projects this would be fine, but for us- we just need to be sure magento has a crontab entry, so when we run bin/magento cron:run stuff actually happens.
So all we want to change is the content of the .ddev/config.cron.yaml to run our cron:install when we start DDEV.
You can add as many - exec: <command> lines as you want! Replace the entire contents with the trimmed version:
1
2
3
hooks:
  post-start:
    - exec: /var/www/html/bin/magento cron:install
Note: It’s important to remove the #ddev-generated line from the file so that it remains unchanged by any project commands.
Start DDEV for the first time
This is where you should start if you already have a .ddev folder. Just be sure that the config.yaml lines up with your project name.
The previous steps are all encapsulated in this repository: https://github.com/Bwilliamson55/ddev-m2
For those that have built the above manually - Normally you would have run ddev start a long way back in the setup, but I prefer to get the services in place before the initial boot.
It doesn’t break or fix anything, it’s just my preference. You can add the above services at any time during a project’s life, and do a ddev restart to enable them.
From within the project
1
ddev start
This will pull and build all of the docker images necessary for the project, before starting it. The time this takes will depend on your network and setup.
The good news is, just like other docker images, once downloaded, following usages are much faster.
Because we did some configuration before Magento is installed, the initial start up will throw a few warnings, which is fine: 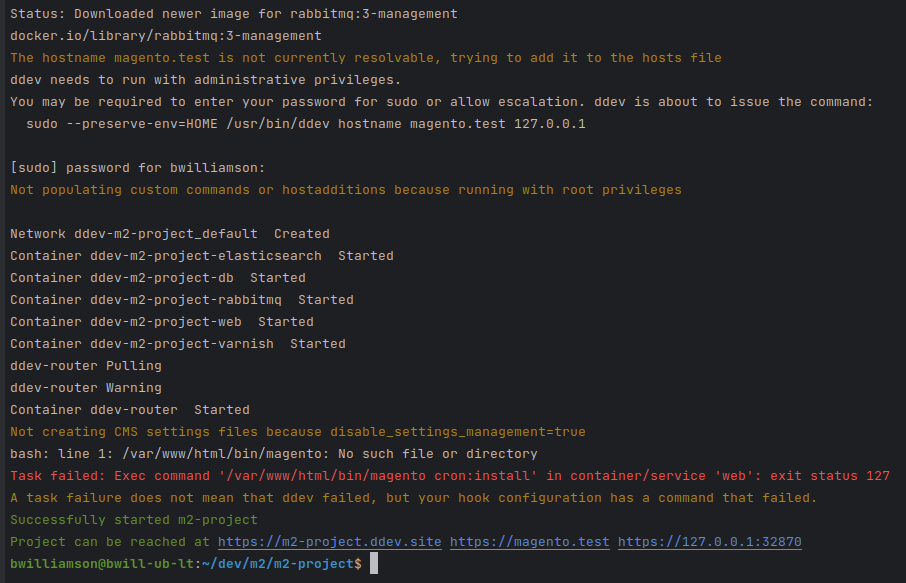
ddev describe
Use ddev describe or one of it’s aliases like ddev status to see the details of every container: 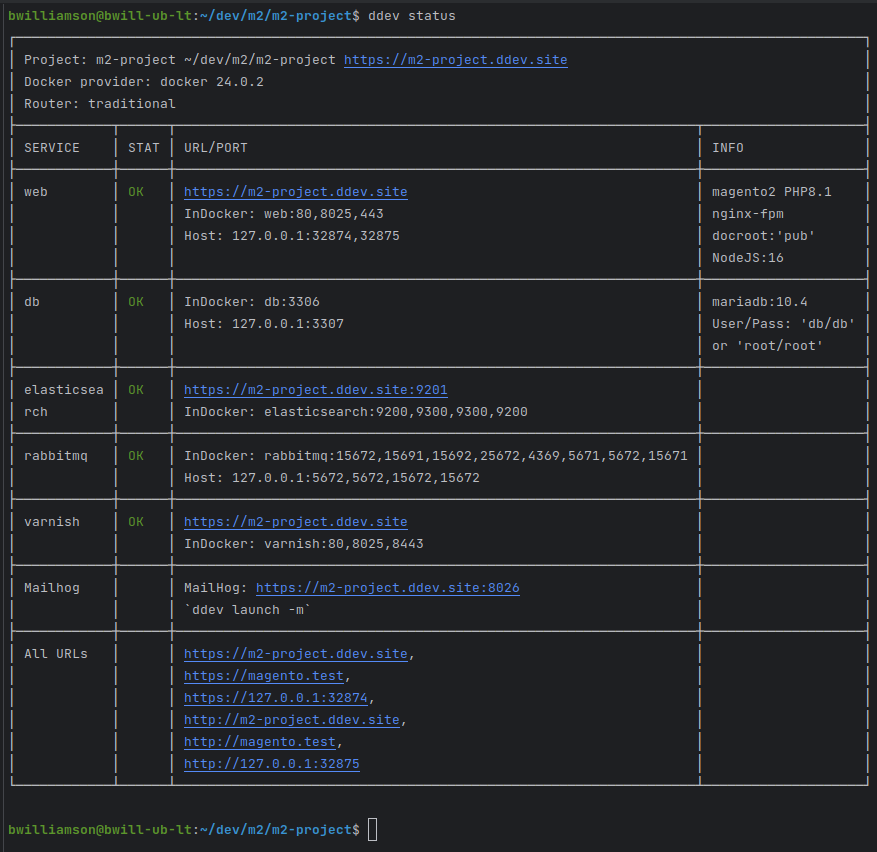
Create Magento Project, and Install
There are a few ways we can go about this part. You can use a very long install command, or do a shorter version with config:set commands later. I’ll be using a small mix of both here, and while it will be a little redundant, it should all work just fine.
Composer
From within the project:
1
ddev composer create --repository=https://repo.magento.com/ magento/project-community-edition:2.4.5 -y
The first thing this will do is ask for your Magento credentials.
Follow the official docs on how to get to those, or create them. Your public key is your username, and your private key is your password.
auth.json
So that our sample data deploys, if you want sample data, it’s easiest to create an auth.json file at the root of your project with your marketplace credentials in it. I do NOT commit this file.
Official docs on the auth.json file go into more detail about it’s uses.
1
2
3
4
5
6
7
8
{
  "http-basic": {
    "repo.magento.com": {
      "username":"public key",
      "password":  "private key"
    }
  }
}
Once the project is created, DDEV will automatically restart.
Again, we have a cron error because it was configured ahead of time: 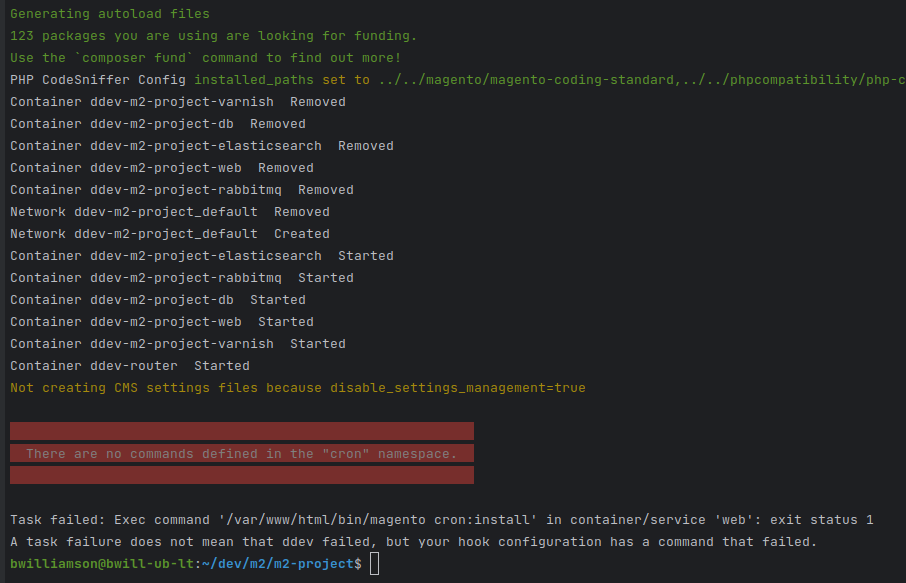
** From here on - any bin/magento commands you see, are from within the container, following ddev ssh **
A note about SSH
From within the ddev project, ssh into the web container with ddev ssh Note: You will automatically be placed in the project directory, usually /var/www/html More info about this in the docs
The part of the docs I want to highlight, for slightly more advanced usage: You can also use your personal SSH keys within the web container. Run ddev auth ssh to add the keys from your ~/.ssh directory and provide a passphrase, and those keys will be usable from within the web container. You generally only have to ddev auth ssh one time per computer reboot. This is a very popular approach for accessing private Composer repositories, or for using drush aliases against remote servers.
This is not mandatory- I just thought it was neat.
ddev magento
You can technically do all this via ddev magento <cmd> from the host, but I have experienced a few oddities during install using that method, and prefer to do everything possible from directly within the container. It makes me feel better about file permissions, especially.
setup:install
1
2
3
4
5
6
7
8
9
10
11
12
13
14
15
16
17
18
19
20
21
22
23
24
# After ddev ssh
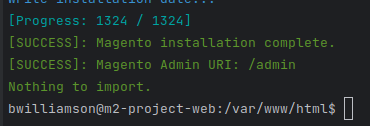
bin/magento setup:install \
--base-url='https://m2-project.ddev.site/' \
--cleanup-database \
--db-host=db \
--db-name=db \
--db-user=db \
--db-password=db \
--elasticsearch-host=elasticsearch \
--admin-firstname=Admin \
--admin-lastname=Admin \
--admin-email=Admin@admin.com \
--admin-user=admin \
--admin-password=Password1! \
--language=en_US \
--currency=USD \
--timezone=America/New_York \
--use-rewrites=1 \
--backend-frontname=admin \
--amqp-host="rabbitmq" \
--amqp-port="5672" \
--amqp-user="rabbitmq" \
--amqp-password="rabbitmq" \
--amqp-virtualhost="/"
Note: You may need to adjust these values to fit your setup. eg base-url will need to match your project name: <projectName>.ddev.site
Take note of your Admin URI
For myself, this is the standard /admin, but if you’ve change it or left it blank it will be auto generated.
You can recall the current URI at any time via bin/magento info:adminuri
Configure Magento
Magento is installed now, but needs a few more tweaks before we should try to really use it. Next I’m changing the mode to developer, relaxing the admin password security, and removing the 2FA requirement.
First, ssh in with ddev ssh
Relax security, and disable 2FA
1
2
3
4
bin/magento deploy:mode:set developer
bin/magento config:set admin/security/password_is_forced 0
bin/magento config:set admin/security/password_lifetime 0
bin/magento module:disable Magento_TwoFactorAuth
 We’re not worried about
 di:compile yet, so we can safely ignore that recommendation.
Configure Varnish
1
bin/magento config:set --scope=default --scope-code=0 system/full_page_cache/caching_application 2
Double check RabbitMQ
While setting up once the install arguments for this didn’t take. My previous notes tend to run the following, as a check and fix in one.
If you didn’t use the amqp switches with your install command, perfect! This is for you.
1
bin/magento setup:config:set --amqp-host="rabbitmq" --amqp-port="5672" --amqp-user="rabbitmq" --amqp-password="rabbitmq" --amqp-virtualhost="/"
Compile, Index, Flush, Sample Data
1
2
3
4
5
6
7
8
9
10
# If you want sample data
bin/magento sampledata:deploy

bin/magento setup:upgrade
bin/magento setup:di:compile
bin/magento indexer:reindex
# cache:flush
bin/magento c:f
# Back to host cli
exit
Let DDEV change things again
` Now we want to re-enable the ddev auto-config, so any base image changes get updated in their respective files. Our files, such as app/etc/env.php do not contain the #ddev generated` line - and therefore are safe from any auto-changes moving forward. Should DDEV need to change one if it’s own CMS files though, we want to let it, now that we’re done installing.
1
2
# Back on host
ddev config --disable-settings-management=false
Yea this looks scary, but again, our files wont be touched because they are not explicitly marked as #ddev generated 
ddev restart
Now we restart to update all the things, with ddev restart
A quick test before moving on
There’s a few things left to configure, but we should have a working store now. Let’s go find out.
Lovely! 
Varnish configuration VCL file
(If you cloned my repository for the quickstart- you can skip this!)
To get varnish really working for us, it needs a vcl file. The ddev varnish add on comes with a decent vcl file by default - but there are specific things we want in our Magento land. Largely any of us doing headless development will need the graphql settings to be just so. In the admin, search for varnish - and expand the configuration to find the export buttons.
The official docs cover this too but it’s a bit more complex than we need.
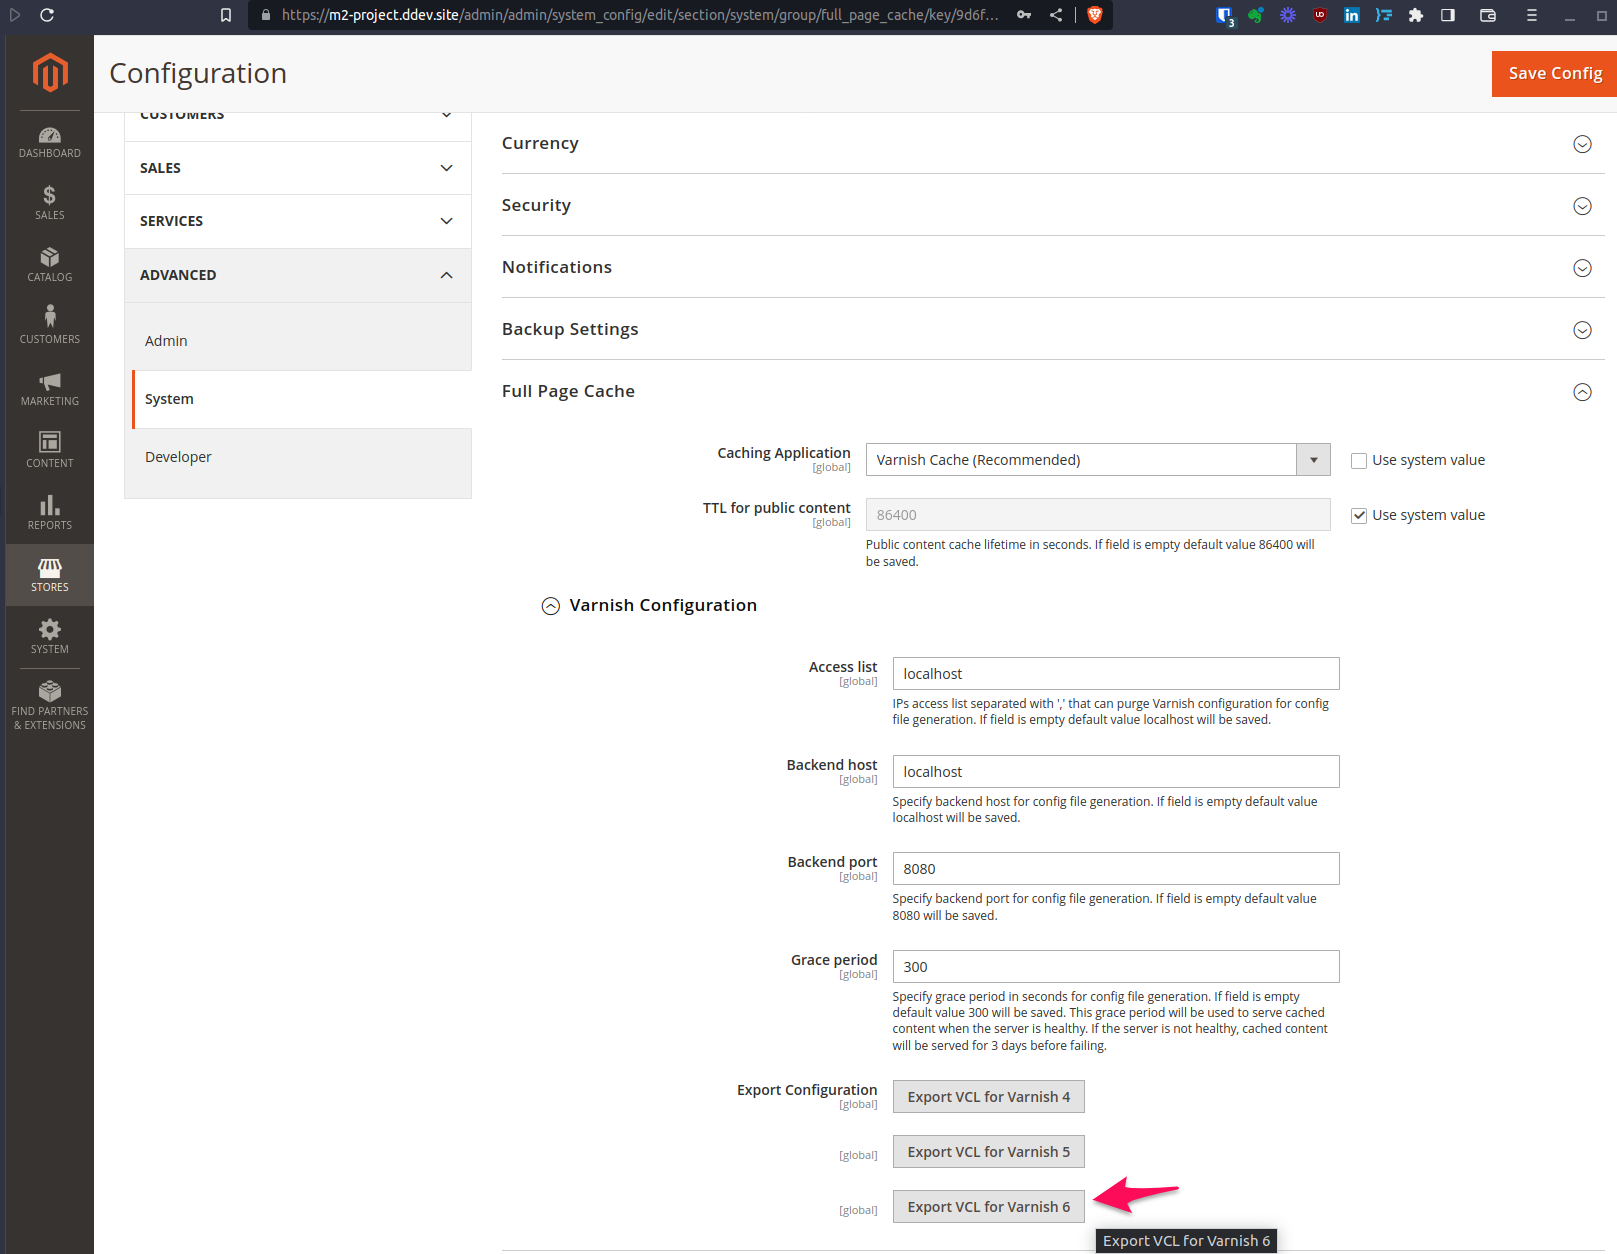
Replace the default file with your magento produced vcl file
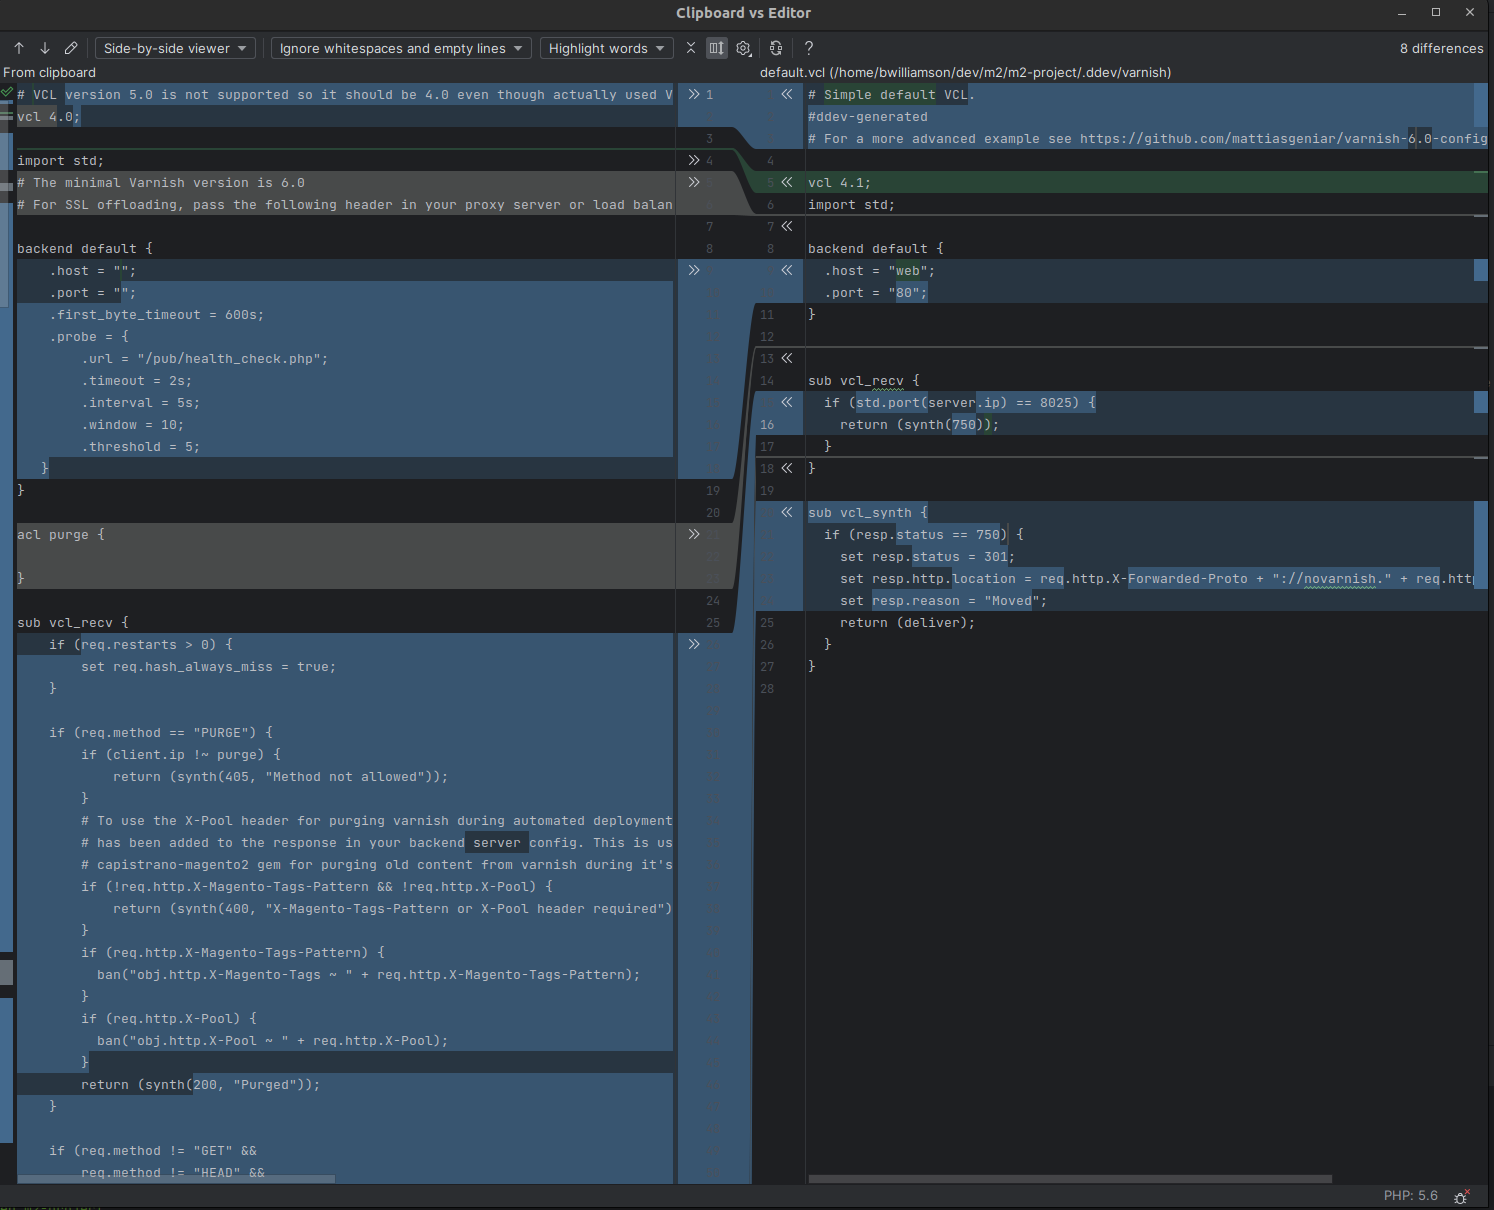
Yea that’s a lot of changes.
Most of what Magento provides is just what we want though.
I’ve made a few tweaks to mine that is most likely applicable to yours too.
Set the host, port, purge hosts, and Follow the docs, adding our hosts to the purge list. In DDEV our web container can be referred to as just web from within docker. From the host, it’s localhost
And add support for EQP tests per official varnish tests documentation 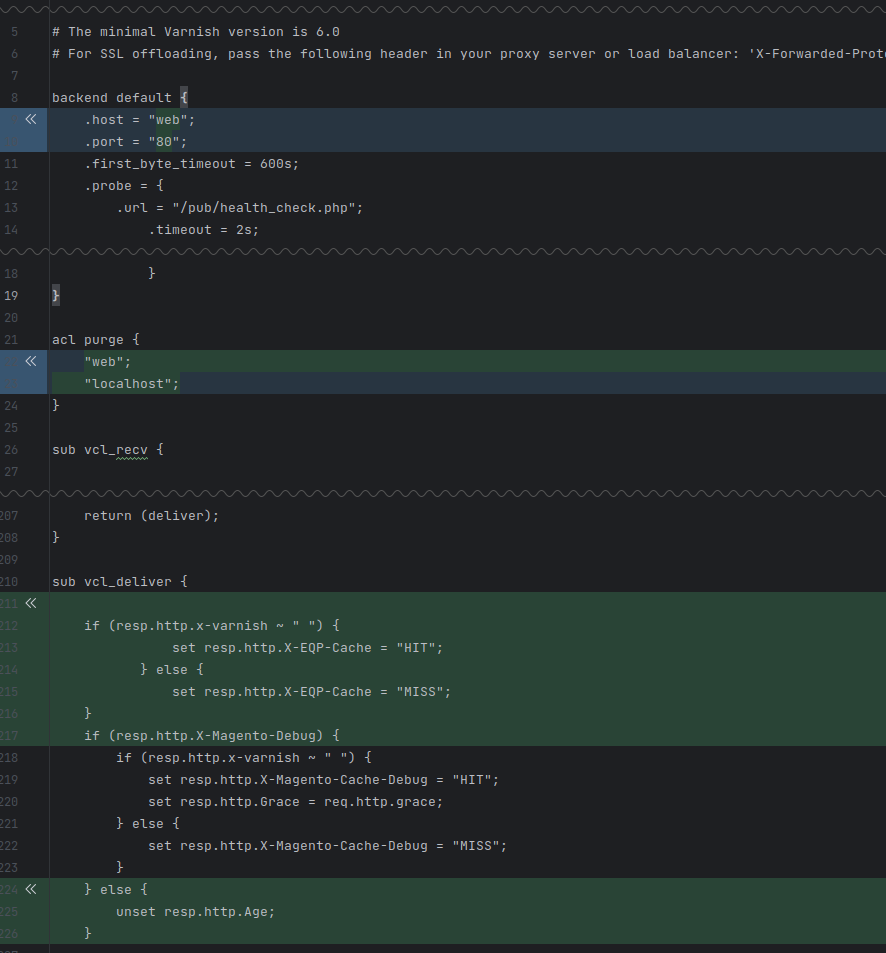
Make the ttl longer for what’s considered healthy: 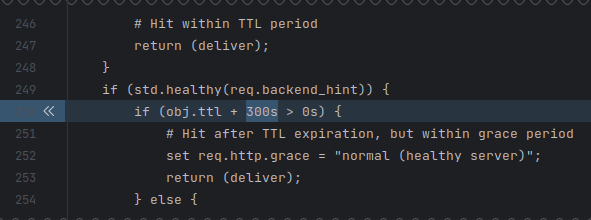
So replace the .ddev/varnish/default.vcl contents with the VCL from Magento. Update the host, port, and purge settings as shown above. Change the EQP things if you like. Here’s my VCL as of this writing
ddev restart
Update ddev’s varnish container with the new stuff with a ddev restart from the host
Xdebug
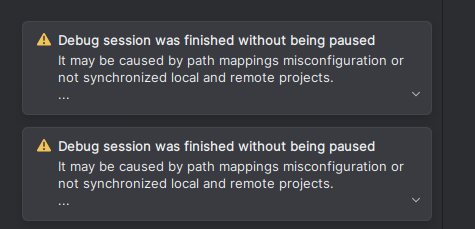
The final note about this setup is how to configure and use Xdebug. This is a common thing to struggle with in any setup.
In my setup I use PhpStorm, but this is not exclusive to that IDE.
From anywhere in the project you can run ddev xdebug on and do your debugging as normal.
When you’re done - disable it with ddev xdebug off.
There is a very noticeable performance impact, depending on your project size, so leave it disabled until just before doing what you’re testing.
PhpStorm, and web-server mappings for xdebug are thoroughly covered in this official doc.
Testing the Services
A few examples of how to test the functionality of this setup, just after creation.
Xdebug
Using the exact steps above, including sample data, let’s confirm Xdebug is working.
Configure IDE
Following the official guide is best for the initial setup NOTE: Make PhpStorm listen for Xdebug using IPv4 by visiting Help → Edit Custom VM Options, and adding an additional line: -Djava.net.preferIPv4Stack=true . The Linux version of PhpStorm seems to otherwise default to only using IPv6.
Set a breakpoint
I chose to set a breakpoint in a view model, to assure it gets triggered, specifically the getProduct method in the catalog module : vendor/magento/module-catalog/Block/Product/View.php:129 
Enable debugging in your IDE
For PhpStorm, there’s a little bug icon in the top right of your interface. The “new look” I’m using may look a little different than yours, gut the icon is mostly the same.
Turn on xdebug in ddev
Run ddev xdebug on This will restart your connection to the backend, which only takes about a second but you may see flashes in the frontend/backend when this turns on.


Map the connection
In PhpStorm you may immediately get a popup with an xdebug connection request.
Sometimes the mapping it offers you is not quite right, so we can double check and set the root of the project manually in the settings, if we like.
You may also see notices like these, which can lead you to the same mapping menu: 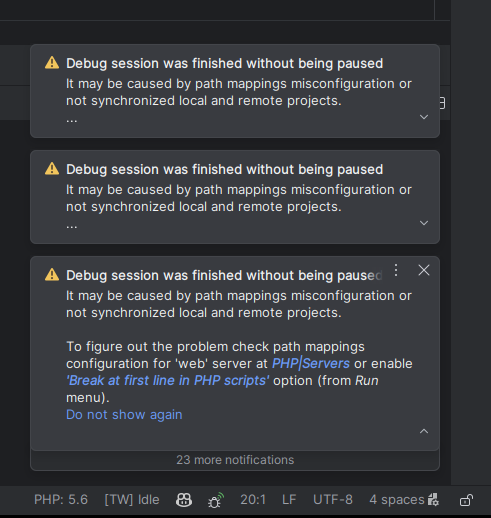
CTRL + ALT + S for settings
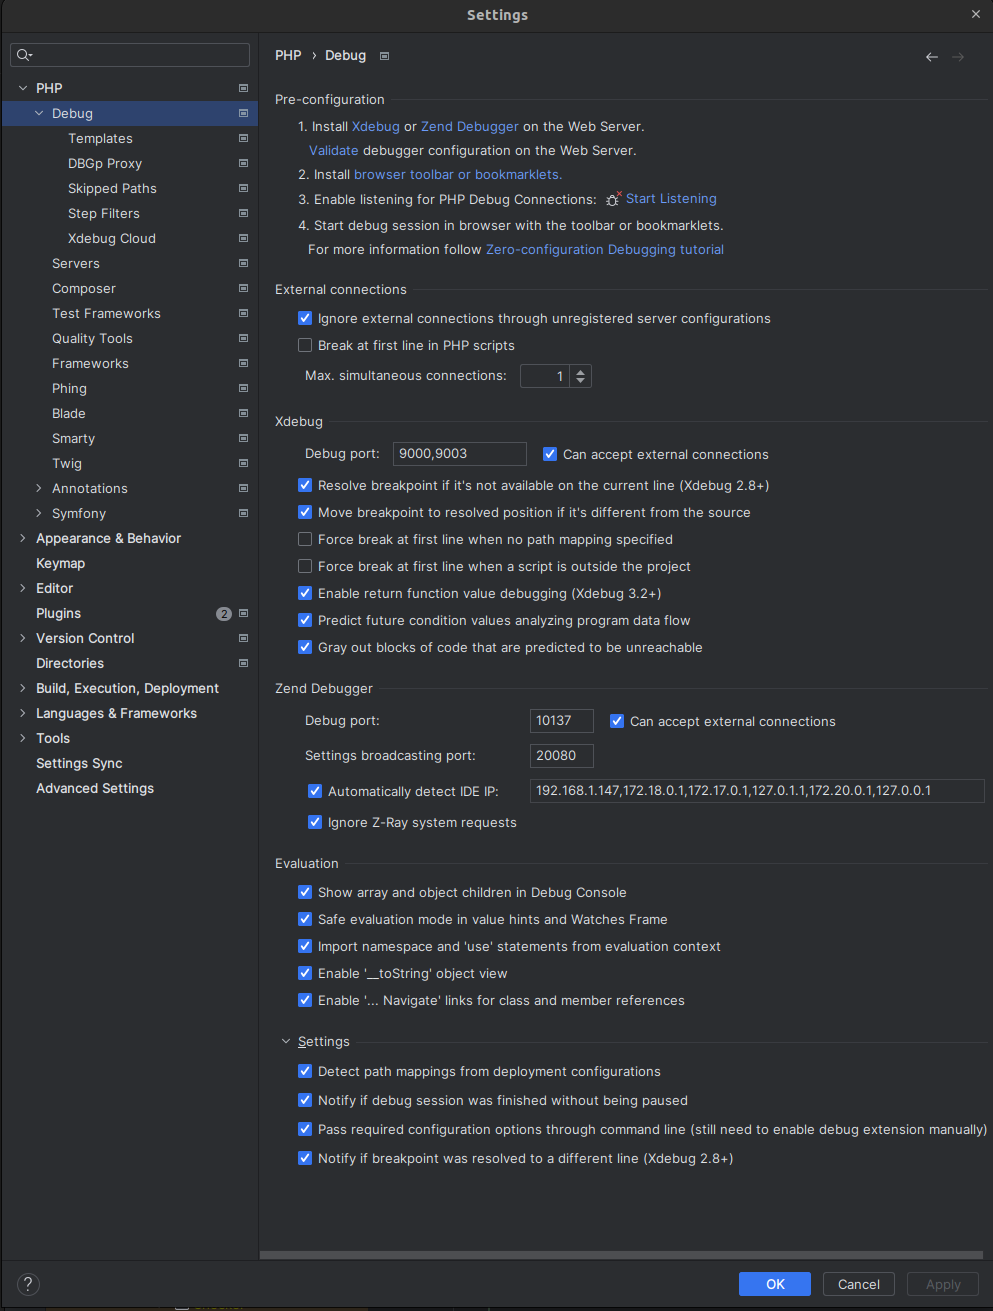
General Debug settings I modify my settings slightly from default once everything is talking:
- Ignore external connections that aren’t a registered server config
- Max connection -> 1
- Force break * lines un-checked This reduces the number of xdebug connections fighting for our attention.
Setting the root of the project is generally sufficient to inform PhpStorm about what goes where, via the PHP->Servers settings: 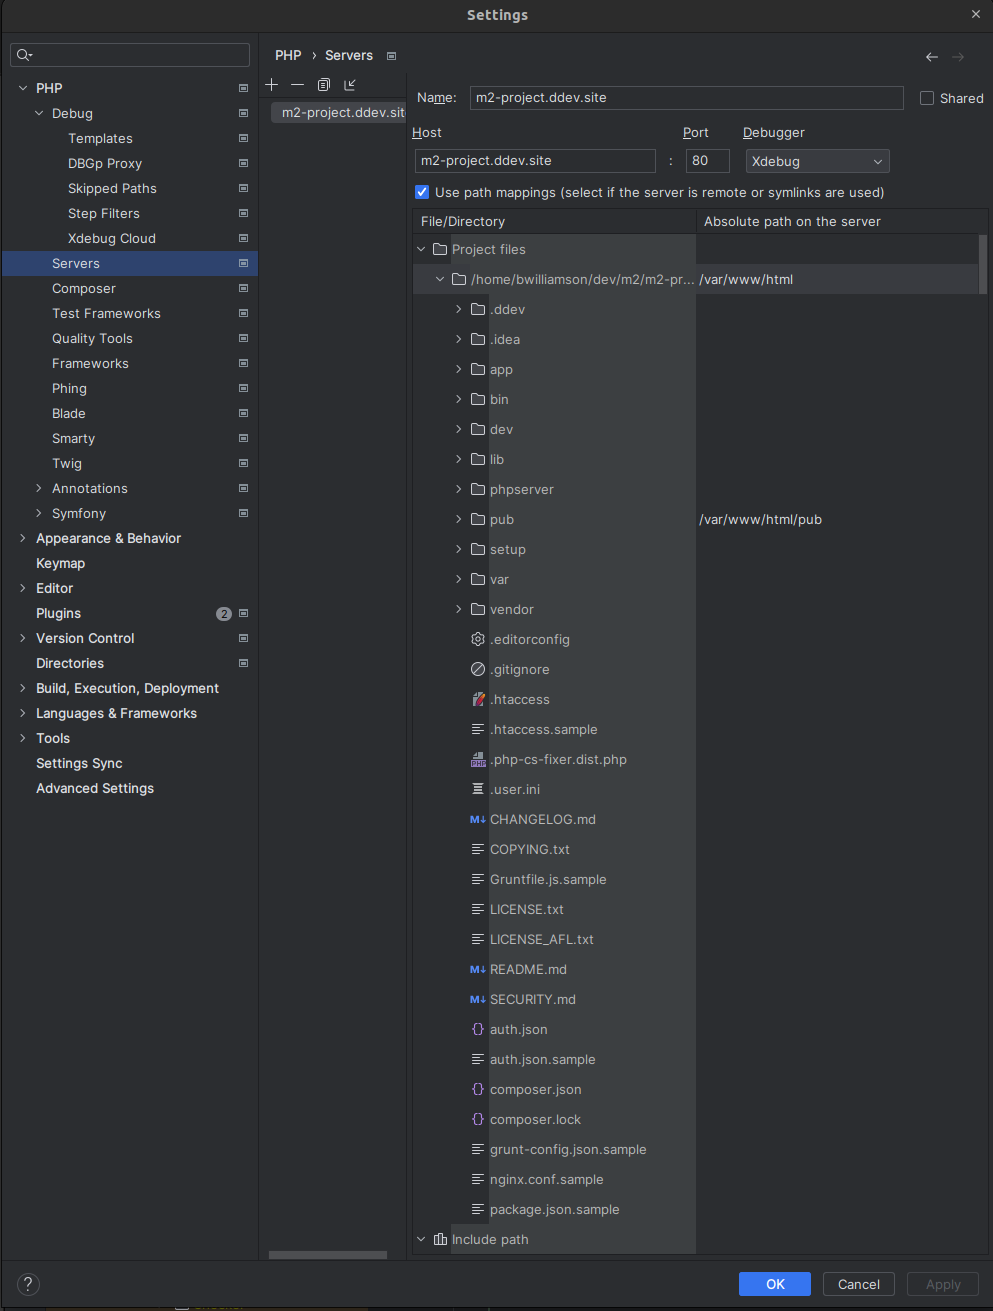
Now let’s visit a product page! Visiting one of my catalog pages, I get a handful of popups about sessions that didn’t hit a break point:
We can disable these notifications if we want in the settings seen previously. After a handful of these we will hit our breakpoint, keep in mind Xdebug can be performance intensive. 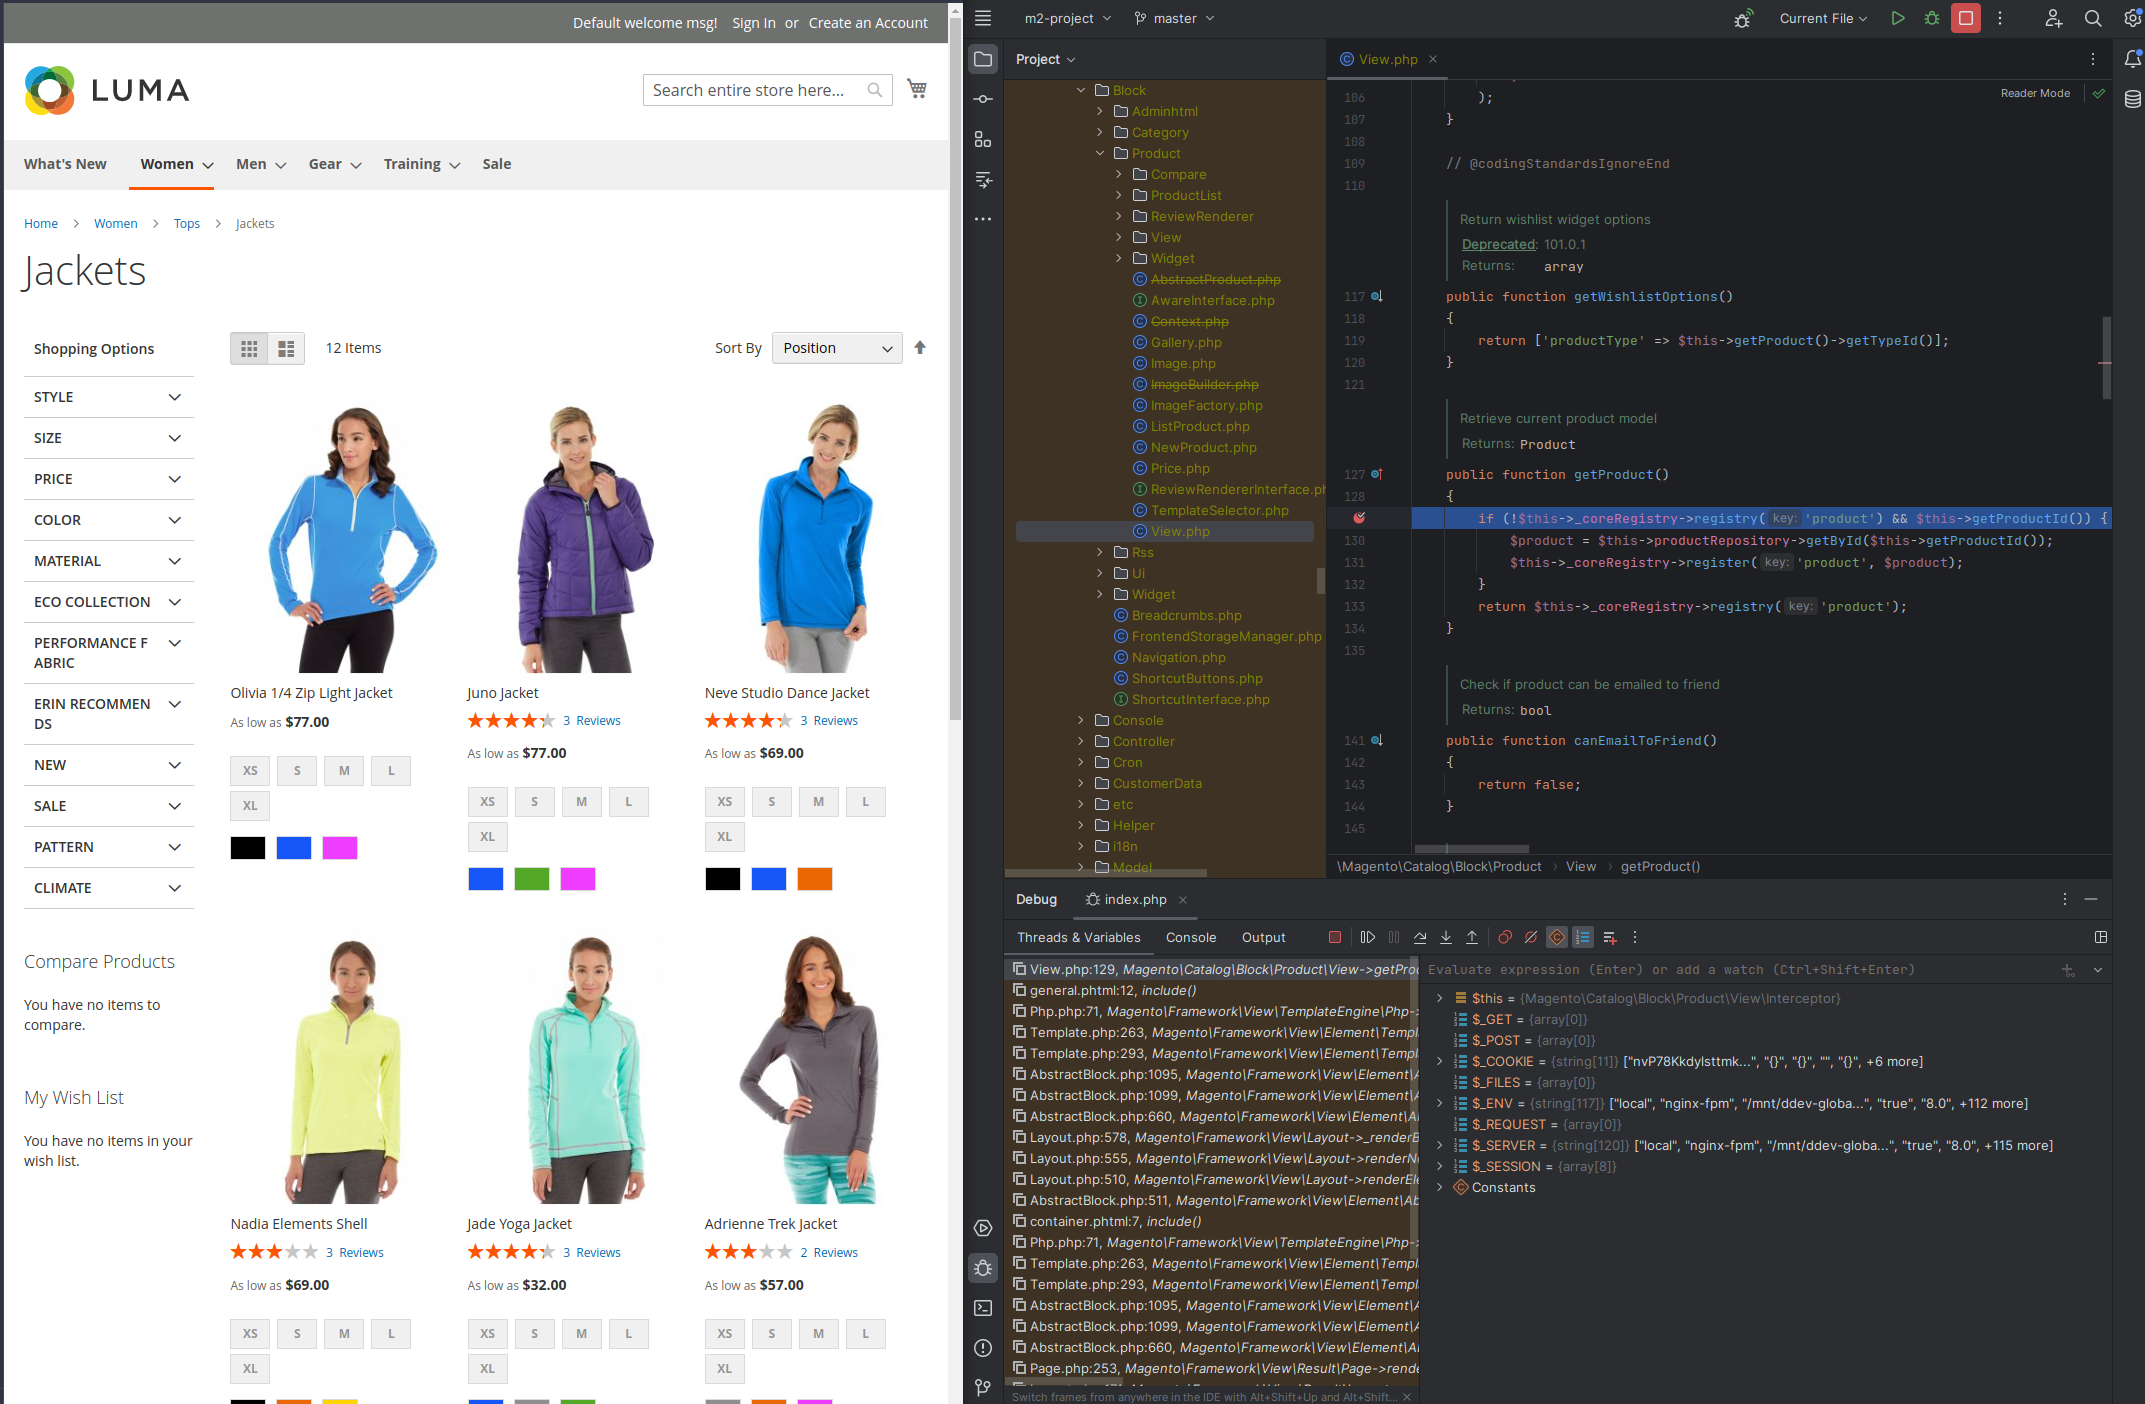
Testing Varnish
There are several places you can edit in your default.vcl to loosen or tighten the calls that varnish caches.
For example, 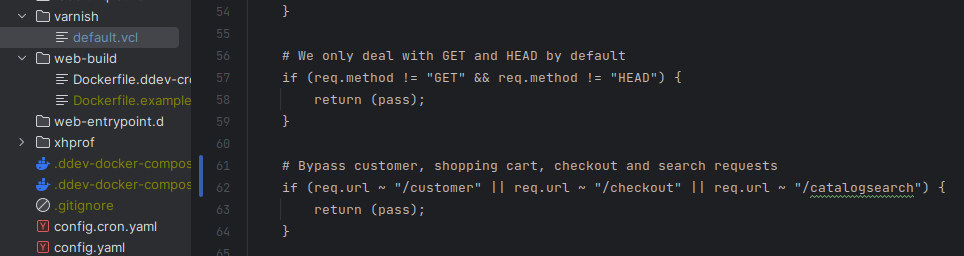
I am not going to dive into the intricacies of Varnish here, and especially not Varnish and GraphQL, but I can say with certainty this setup does cache things as we expect in GraphQL land. I’m wrapping up the SwiftOtter GraphQL course right now, and Chris does a fantastic job diving into all the “fun” we can have with caching GraphQL.
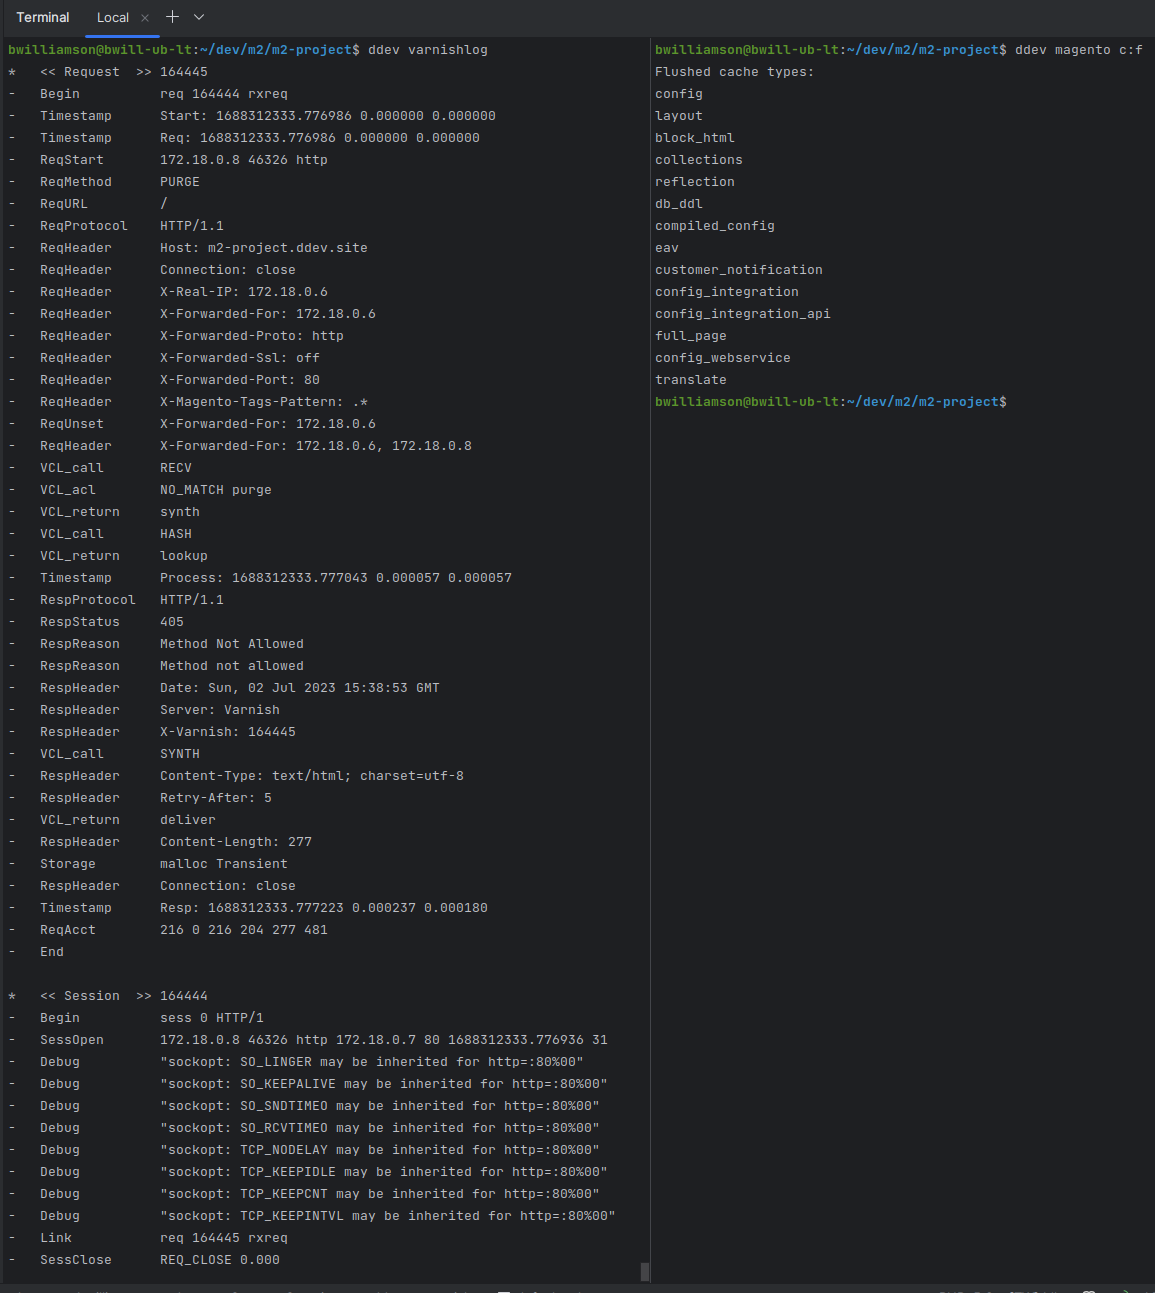
For a simple test - we can simply run ddev varnishlog in one terminal, and ddev magento c:f in another. Then inspect the action.
We should see a PURGE event, telling us that our varnish container got the correct message- and has dumped our cache for us.
For more advanced varnish testing and debugging, refer to the official docs , and the ddev-varnish readme. The ddev-varnish add on includes all the CLI commands you may be looking for.
Testing RabbitMQ
To test rabbitMQ we need to be sure a few things are in place first.
- Our cronjob
- Our exchange and queues are present in RabbitMQ
To test the cronjob- we can ddev ssh into the web container, and simply run crontab -l : 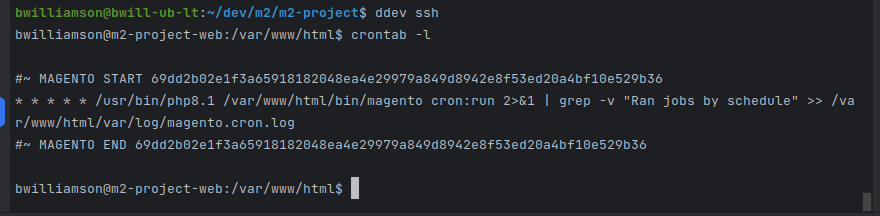
The crontab attempts to install itself on every ddev start and will gracefully fail if you do ddev start while ddev is running. How this was included in the project is outlined in the steps for adding the cron service.
Ok does it blend?
 Excellent!
Now we visit the RabbitMQ GUI at http://m2-project.ddev.site:15672/ (Notice- HTTP) You can also refer to these types of details via ddev describe or ddev status
Login with username: rabbitmq and password: rabbitmq
On the Exchanges tab - I see I do not have the Magento exchange listed: 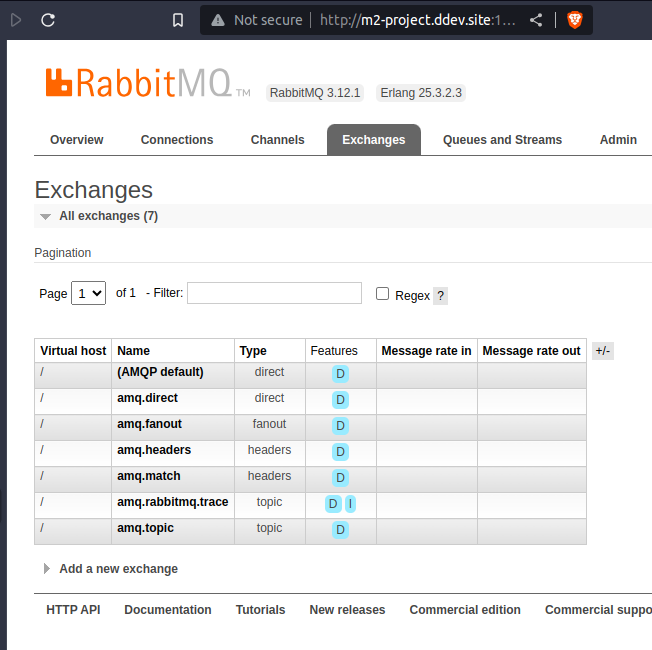
Assuming we have run our cron - the queue should show up after bin/magento setup:upgrade : 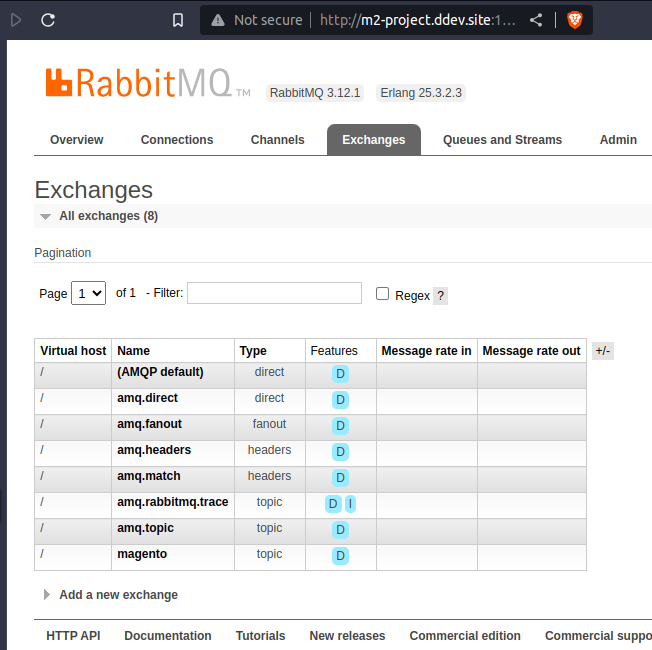
Now in our queues tab we can see all the magento queues: 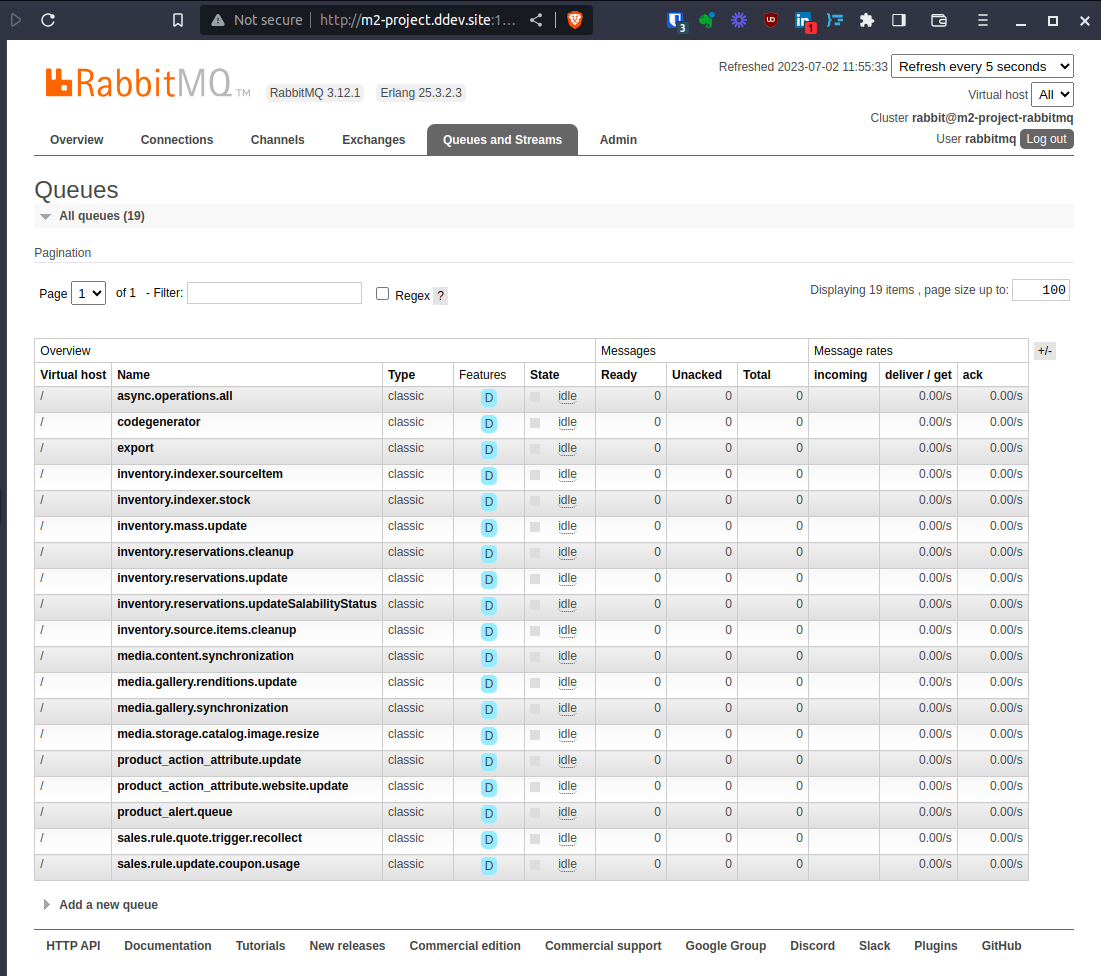
Moving to the Magento admin, let’s send a queue message via a product update.
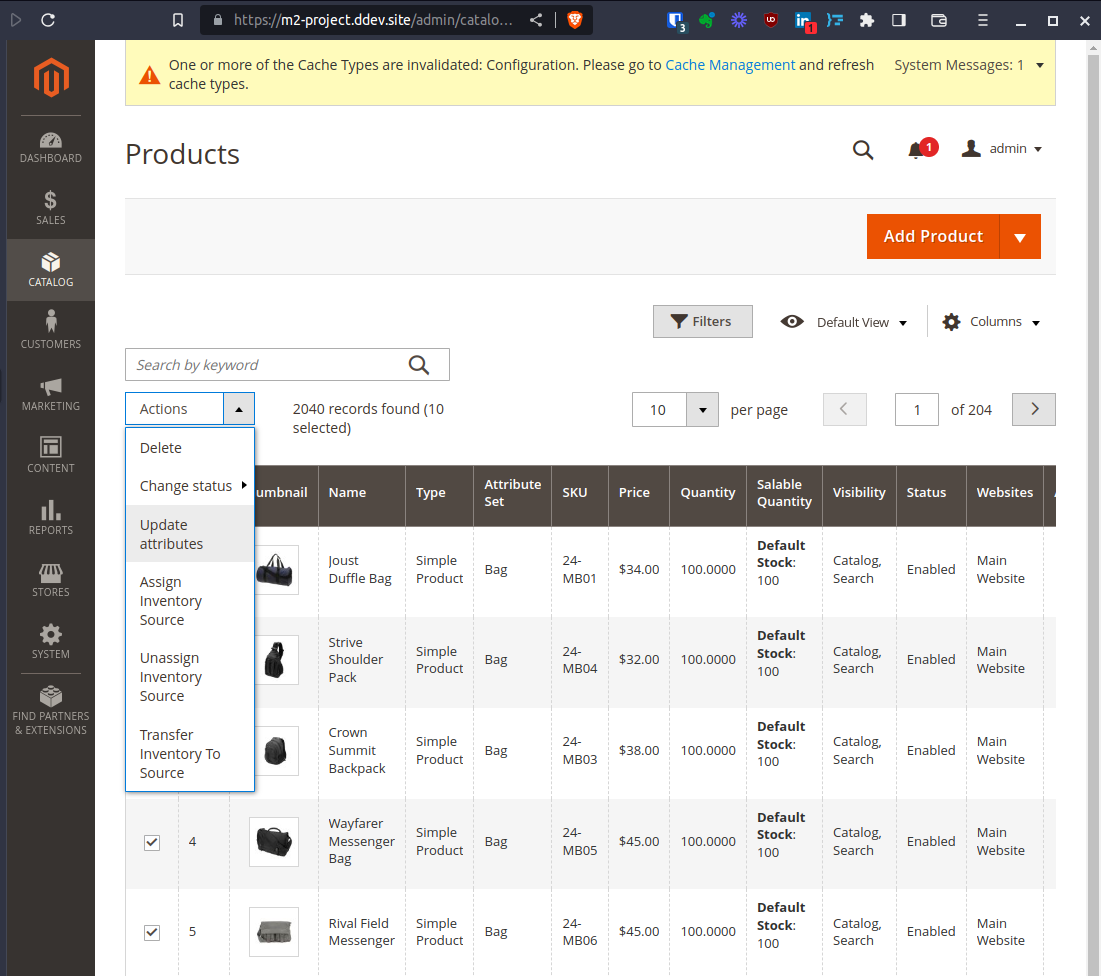
For the test I’m just changing the country of manufacture: 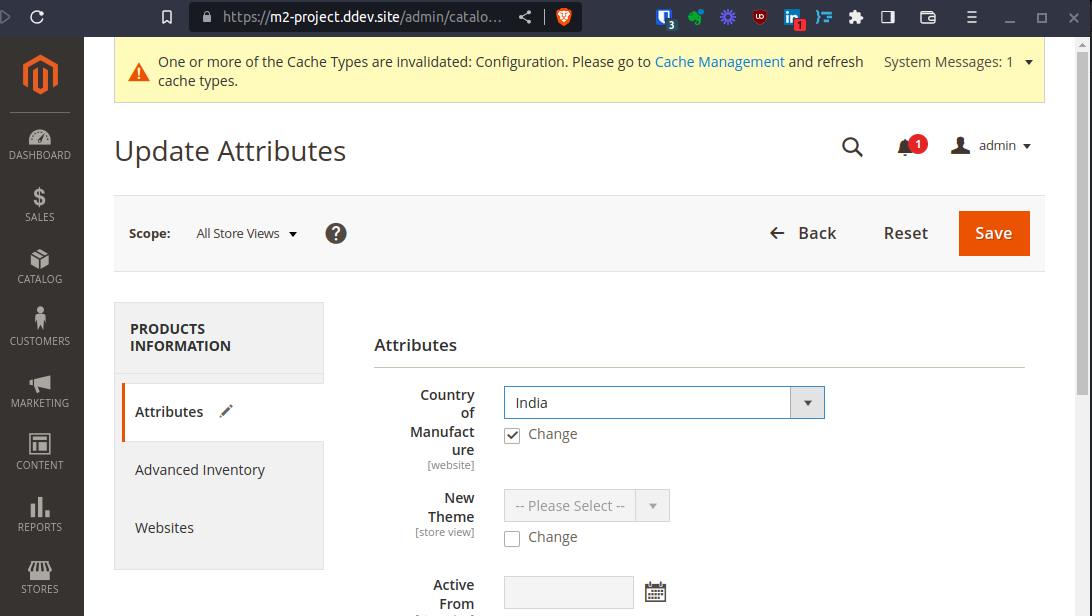
Message added to Queue! 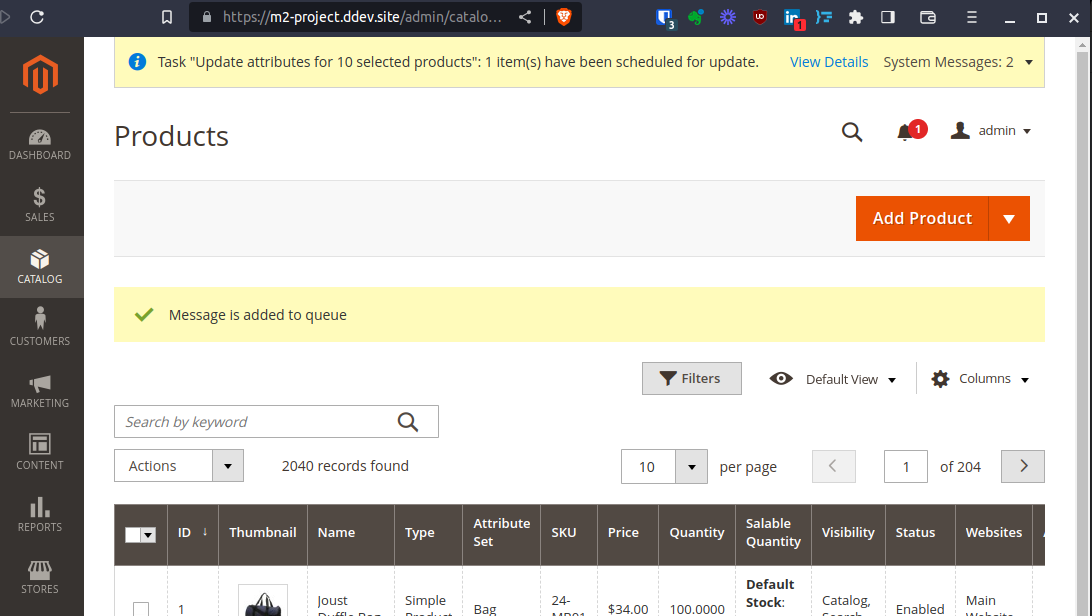
Was it though? Back in our RabbitMQ GUI we will either see a “1” in our queues, or a status of “running”. I was a bit too slow to catch the message sitting in the queue, and cron ran the change, leaving us with this view: 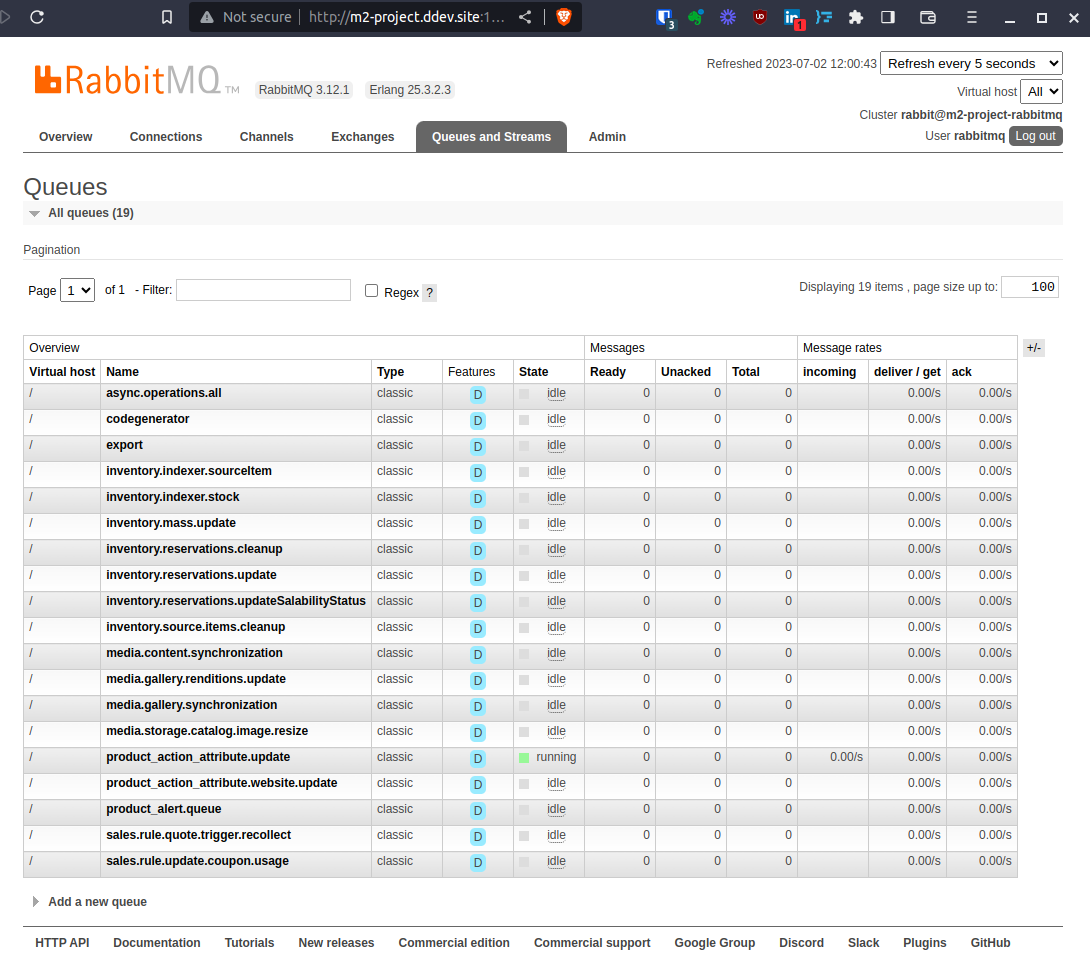
After adding the Country of Manufacture field to my product grid columns, and refreshing the page, we can see the message did indeed get processed: 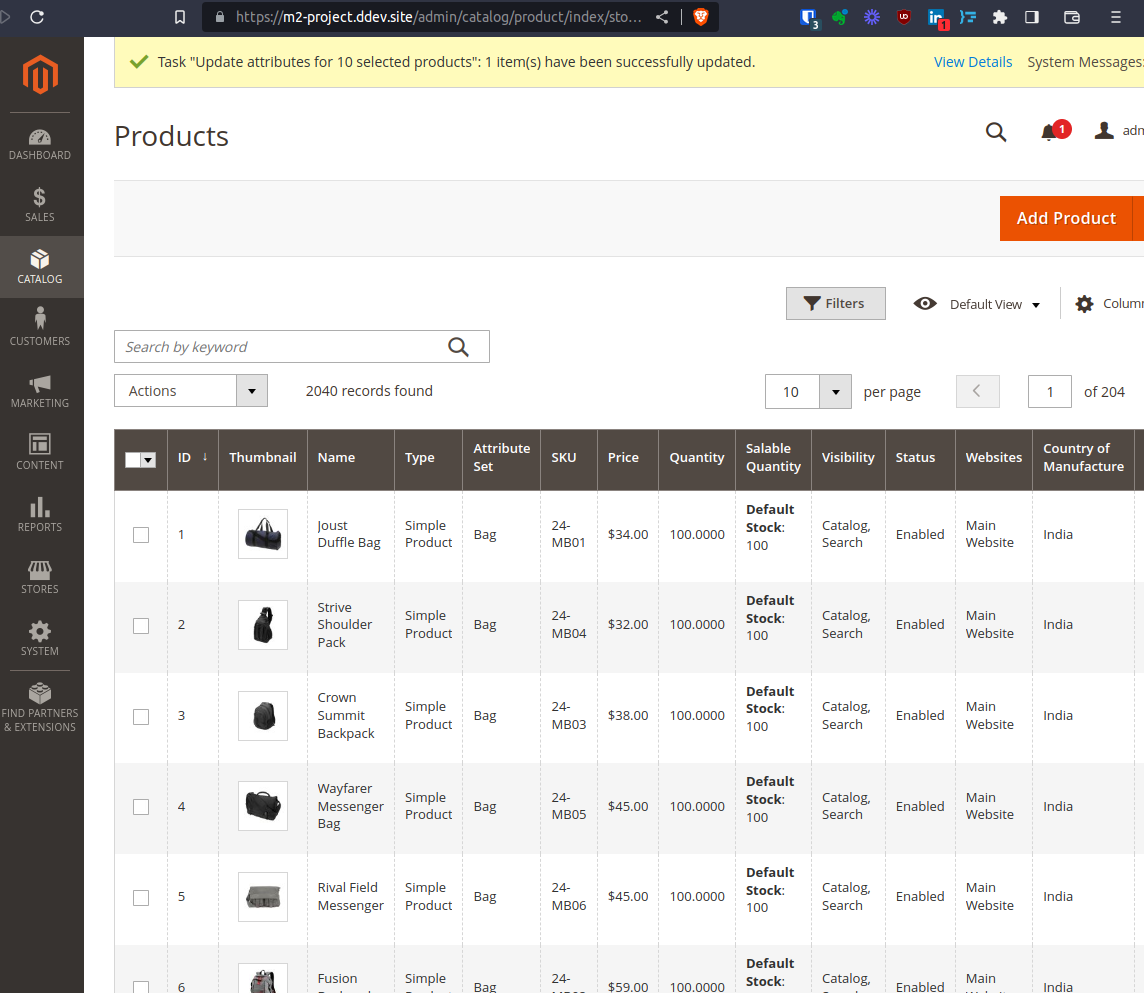
Wrap up
I hope this setup is easy for you - if not, don’t use it! This is my preferred setup, so I’m documenting it for future me, and future you, if you like. For me, I don’t need the perfect local development environment. And although this is pretty perfect to me, perfection is usually analogous with unattainable.
My mantra is Trade perfect for done
Use what gets your stuff done. Don’t use things solely in the pursuit of perfection.
As always - I have you found this interesting!
Comments powered by Disqus.